 |
|
|
|||||||||||||||
| Go to page: 1 | 2 | |||||||||||||||
| Intensive Stain Removal
|
|||||||||||||||
|
Add noise and Gauss Blur. | ||||||||||||||
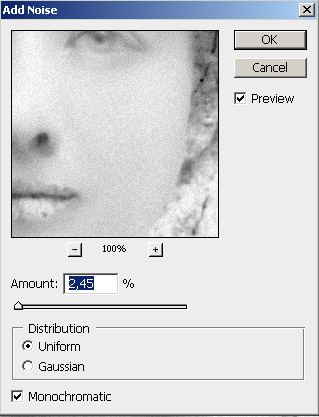
Now we add some noise to simulate skin texture:
Use: Filter -> Noise -> Add Noise: - Distortion: Uniform; - Amount: 2,45; - Monochromatic.
|
 |
||||||||||||||
|
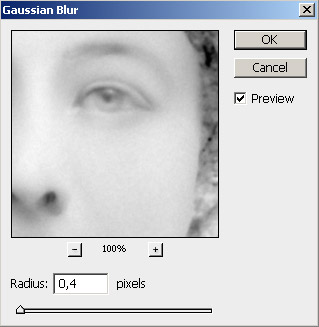
Reduce noise effect by choosing : Filter -> Blur -> Gauss Blur: Radius: 0,4 px . |
||||||||||||||
Now we are ready to apply a History Brush to our image. |
|||||||||||||||
| ************************************************************************************ | |||||||||||||||
Set last action “ Gaussian Blur “ as source for the History Brush; |
|||||||||||||||
| Return to top using the History Palette to a “ Curves “ state; | |||||||||||||||
| Paint on the image with History Brush, | |||||||||||||||
|
|||||||||||||||
|
|||||||||||||||
| ************************************************************************************ | |||||||||||||||
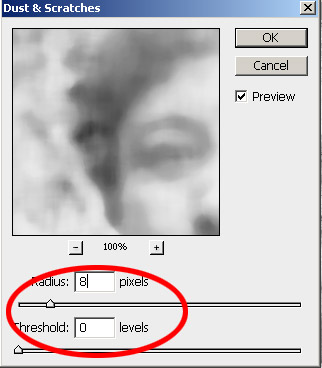
Apply Dust and Scratches to face
|
|||||||||||||||
In the step we selectively apply Dust an Scratches filter to fix the eyes , lip and nose, Use: Image -> Noise -> Dust and Scratches: - Radius: 3px:; -
Threshold: 0px.
|
 |
||||||||||||||
|
|
|||||||||||||||
| ************************************************************************************ | |||||||||||||||
Paint with Clone Stamp, Smudge Tool and Brush to fix:
|
|||||||||||||||
| the eyes : | |||||||||||||||
| the nouse : | |||||||||||||||
| the lips : | |||||||||||||||
| add volume to face: | |||||||||||||||
| add hair : | |||||||||||||||
| background replacement : | |||||||||||||||
| add Sepia Tone : | |||||||||||||||
| ************************************************************************************ | |||||||||||||||
| Go to page: 1 | 2 | |||||||||||||||
|
|||||||||||||||